A couple of years back I was eyeing up my motorcycle collection, wondering if it was time for a change. The BMW (GS) was getting on a bit although perfectly functional. But its a big old bike and whilst ideal for two up touring it's a bit OTT for one. My aged DRZ400 was looking increasingly dilapidated and likely to die at any time having commuted me through numerous winters. The two Ariels were fine and in need of more use but I was thinking that a lighter road burner was the ticket. Various new bikes were scrutinised but nothing caught my eye. Thanks to the increasing need for tech and electronic gadgetry on modern machinery, they were all getting bigger and heavier. Even the modern 'retro' bikes seemed to be lardy tanks with soul-less engines and pretentions towards something they clearly weren't. I was also wary of tying myself into dealer servicing, with its attendant costs and hassle.
Inevitably I felt drawn to so called 'classic' machinery. Specifically a Triumph twin. Many years ago I'd successfully run a 650 Trophy with an entirely reasonable level of maintenance input, doing around 30k over 8 years. In fact I'd only sold it as it was so reliable and lacked the old bike charm that a big single provides. Enter the Ariels.....
Except prices for the 650's were through the roof so I figured on one of the '70's 750's which should be available for reasonable dosh and would be both reliable and able to keep pace with modern traffic. So much for that idea as six months of searching drew a blank. Nothing in any of the rags and ebay stuff was just a comical rip off. Nearly everything was obviously being sold by a 'dealer' (chancer) who had not a clue about what they were actually selling. Silly prices and ads with far too much "its an investment" (they aren't) / "it will appreciate" (not necessarily) / "its totally original" (nope) / "its got matching numbers" (it has now thanks to your stamp) and other bullshit did not inspire. The matching number thing particularly irked me. Many (most?) of these things would have had replacement engines at some point, or at least replacement cases; so how come every single one of these was matching? Quite.
Chatting to a mate then led to a change of plan. He noted that the 750's were fine but a 650 would be a far better prospect if I could get my hands on one. Funnily enough we had a similar conversation in 1997.... So I set him to work scoping one out and switched engine sizes on my own searches, thinking I'd try to get a bitsa that would avoid the horrible prices and bullshit and could be done up as a desert racer. Then another mate dropped by and hinted that my old one may be available as it had been bought by one of his mates after I sold it to one of mine. Hmm. That would be a score as I knew it hadn't been altered since I had it plus I knew how much the guy had paid for it. In the event the owner wasn't biting. Keith suggested he may sell me one of his commando projects but I was a bit underwhelmed after reading one of the books on this model. A good bike for sure but a lot of knowledge was required to make it (and keep it) so, which I would have to learn.
A Bonneville project came up in the Borders but we were fully into the lockdown by this time and when restrictions eased it was long gone. Ebay only seemed to have either ludicrously over priced restorations (most of which were wrong, handy knowing these things inside out) or laughable 'projects.' In the good old days a project was a project - a mostly complete bike but in bits or just knackered. My last Trophy had been one of these and turned into a cracker. But these things were quite clearly the left overs from someone else's project and of little use other than for spares, if the prices being asked weren't so crazy. "All missing parts available from ebay" claimed one seller on what was basically an incomplete engine, a frame and a handful of rusty bits, selling for £2500. He was right, except the missing bits would cost you £5000 and take three years to track down. A few more sorted things appeared but the descriptions clearly indicated the seller wasn't the owner. I dread to think how many people have sold off Dad's silly old motorbike to some con merchant for pennies, only for it to appear on ebay for many times more.
Finally, having almost given up, I spied a 1970 Trophy, being sold by a guy in Aberdeenshire that he'd brought back in from the states. The green paint caught my eye as this was the colour of a '70 Trophy (technically in 1970 they became 'Tigers' but all of the pre Oil framed 1971 bikes are referred to as Trophys by the cognoscenti) featured in an American motorcycle book Mum and Dad had bought me many years before and lead me to my previous one (which was black in the event). Closer inspection of the very good photos (A nice change, it amazes me how many people post up blurred / crap photos for something they want £8k for) suggested it was genuine and looked in remarkably original condition and totally complete. Hmm. I would be bidding on something unseen (it ended the next day so no chance of an inspection) and handing over a stack of cash if it went my way for something which could be a piece of well disguised shit wasn't something I wished to do. But, the bidding wasn't going up much, the advert was worded as if the guy actually wanted to sell it rather than to stitch somebody up; and closer scrutiny of the photos (including the engine and frame number) made it all look good. Many an ill-judged purchase on Ebay has been done after a few beers but I did it anyway. I put £5k on which I judged to be its maximum worth to me but less than its actual worth. And lo, I got it and for £200 less than my max bid. Oh shit, now what. First up I made contact with the seller and ended up on the phone to the guy for half an hour. He was friendly and genuine so I made the payment and told him I'd be up to get it the next day. This was just as the pandemic was all going pear shaped again so I wanted to get up there and back before the government told me I couldn't. It was a foul day but on arrival, the bike was at least as good as my best possible expectations, only a hideous set of apehanger handlebars spoiling its clean lines. As it happened my previous Trophy had just such a set of bars - actually those fitted to a US export T140. I got it home and immediately set to, to see what I had landed myself with.

Homeward bound.
Triumph twins are something of a ubiquitous British Bike. They started life as the 500cc 'Speed Twin' but 650cc versions soon followed. The show stoppers were the Bonnevilles - so called to celebrate a streamliner powered by a tuned 650 lump breaking a landspeed record at the US's Bonneville salt flats. However the previous versions had already found their way into other sports - specifically scrambling over here and desert racing in the States. When you see the size and weight of these things you may doubt this but they really were typical of what was being used off road in those days. After Jim Alves won a Gold Medal in the '48 International Six Days Trial, Triumph cashed in on this and launched the 500cc 'Trophy' model, specifically aimed at off road events. Later 650 versions got more ISDT gold medals, famously by Bud Ekins, stunt double for Steve McQueen, and the man himself. In fact the bike used for the jump scene in The Great Escape was a 650 Trophy, not a German bike, and ridden by Bud with Steve doing all of the other riding shots. By the time mine was made they had been thoroughly developed into a solid performing road burner that made for a fine handling and reasonably quick machine.
However this only reads true when looked at in isolation (or compared to other Brit bikes). In the context of the world motorcycle industry they were an anachronism. By 1970, Japan was in the ascendance and beating off stiff competition from Europe, the UK and the States, traditional dominators of the bike market. Why buy a rattily old pushrod 650 dating back 25 years, with no electric start, oil leaks from the factory, no indicators or mirrors and a need for much maintenance when for not a lot more you could by a smooth 4 cylinder Honda which went faster, smoother, quieter and for longer. For a few years British bikes traded on superior handling and being home spun but the writing was on the wall.....
Of course this is now all irrelevant. I've always resisted the whole classic aura thing and treated the machines like every other bike I've had, i.e. it has merits and disadvantages which you make the best of. Aside from the 'its a classic' bullshit a well sorted Triumph 650 is light weight (just less than 400lbs, nearly 80lbs less than a modern Bonneville) has 45bhp (good for 70mph cruising and snappy enough off the line to beat most cars), good brakes (drums front and rear but far better than the dodgy disks which were emerging at the time) and very good handling. This is down to a combination of the light weight, low centre of gravity and smooth power. Also Triumph had enough racing nous to make a frame which was stiff with geometry that provided nicely neutral handling, easily exploited without any of the heroics needed to get the best out of the contemporary Japanese offerings. And they are easy to fix, bits are readily available and, dare I say it, a refreshing change from the complexity of modern tackle. That said having a computer handy when you're working on them is essential these days as there is a ton of info available on the net, as well as workshop manuals and parts catalogues. By 1970 (actually by '67) the Trophy only differed from the flashy Bonny by different paint schemes and one carburetor instead of two. But this just meant easier maintenance and not much less performance.
So off we go. I guess this could be considered to be a 'lockdown' project and it certainly helped me pass many long evenings. First up was a thorough wash, losing the horrible bars and applying to the Triumph Owners Club for a dating certificate. As it was a US import it only sported a Georgia plate with a 93 on it. This turned out to be the US equivalent of our tax disk so I guess that's when it was last on the road. It showed 16k miles which looked to be genuine. In fact it was all genuine. Everything, and I mean everything, was as it had left the factory, barring some rust, a few scrapes and a pair of little worn but perished tyres. Georgia is a southern state and so technically snow, and therefore salt, free. And rust free. Well not quite, but bolts were coming undone which on a UK bike would be a corroded lump requiring an angle grinder. As far as I could tell the engine hadn't been apart excepting the primary drive and gear box covers and the rolling chassis bolts all looked similarly un-disturbed. It had been down the road on the right side but nothing looked to be bent, just a few scrapes on the silencers.

The makings of a good 'un. If I only I knew what was coming....
First up was to get it running. I rebuilt the carb, replaced fuel lines, cleaned out the tank with some proprietary stuff that brought it up a treat (and got used on lots of rusty fasteners as well,) changed the oil, dumped the ancient battery and substituted an old DRZ one I had lying around. It took a couple of kicks and a bit of running on one cylinder before finally fired on both and settled down to a lumpy but steady tickover. No horrible noises, no smoke and that nice hollow but muted bellow that typifies a Triumph twin. But, there were the makings of a horrible top end oil leak, custard in the gear box and the clutch plates were stuck fast. So some dismantlement was required to ensure that all was well before I started putting miles on it.
Overall it was in pretty good nick with faded but good paint on tank and guards and reasonable frame paint. I wanted to make sure this was preserved so I did a fair bit of cleaning up and painting of various bracketry, painted under the mudguards (still showing the original paint!) and undid, cleaned up, greased and replaced all the various nuts and bolts around the rolling chassis. The petrol and oil tank are all mounted on rubber bungs which had all perished to the consistency of cheese so they all got replaced. The tank paint was left as is. Bikes with original paint are now very thin on the ground so a re-spray was a no-no. Plus once you do one bit you have to do the rest and before you know it you'll have another shiny, over-restored trailer queen.
Whilst I was on I checked out and cleaned up the brakes (fine) and forks (full of custard but also fine) as well as fitting a new set of head bearings. The original wheel bearings were pronounced fit, re-greased and re-used.
Pulling off the primary chain case was a little nerve wracking as this would give the first indication of what the rest of the lump would be like. The clutch plates were prized apart and pronounced serviceable, although they were non-standard so had obviously been changed at some point. The primary chain was worn but had plenty of life left and the only minor blot was signs of the keyway on the crank holding the alternator rotor on having been damaged. This is a not uncommon problem caused by the nut coming loose. There are various fixes but I settled for a new key, lots of high strength loctite and a big flat washer under the nut. A bit of a bodge but my previous TR6 had run for all of its life like this.....
Next I went into the gearbox as the oil was a bit custardy (caused by water contamination, likely through the clutch cable outer). The gears were mint but a previous owner foul up was revealed. It looked like someone had had a go at drilling out the boss on the under side of the gear box shell to take a detent plunger. For 1970 Triumph fitted a leaf spring to index the gear change cam plate and a common mod is to drill out the boss (which is still on the cases) to fit the earlier detent as it is more robust. But they had obviously cocked it up as the hole had been welded up and then ground off on the inside. All a bit weird really as this mod generally only gets done after the leaf spring had broken and the bike had wracked up lots of miles.....
I've seen much worse bodges but a shame given the condition of the rest of the machine.
I changed the gearbox sprocket whilst I was on and noticed that its oil seal was hard and perished. Mental note, change all the oil seals. So this then all got boshed back together. Fitting the inner cover took me back 20 years. There is a knack to this as the gear change selector mechanism has to be indexed properly or else you end up with a single speed motorbike. The manual said one way but it rang a faint bell that this wasn't right for my year with the leaf spring index thingy. I bit of head scratching and web searching brought it all back. Build it up in top, not third. All four gears were verified then the outer cover went back on.
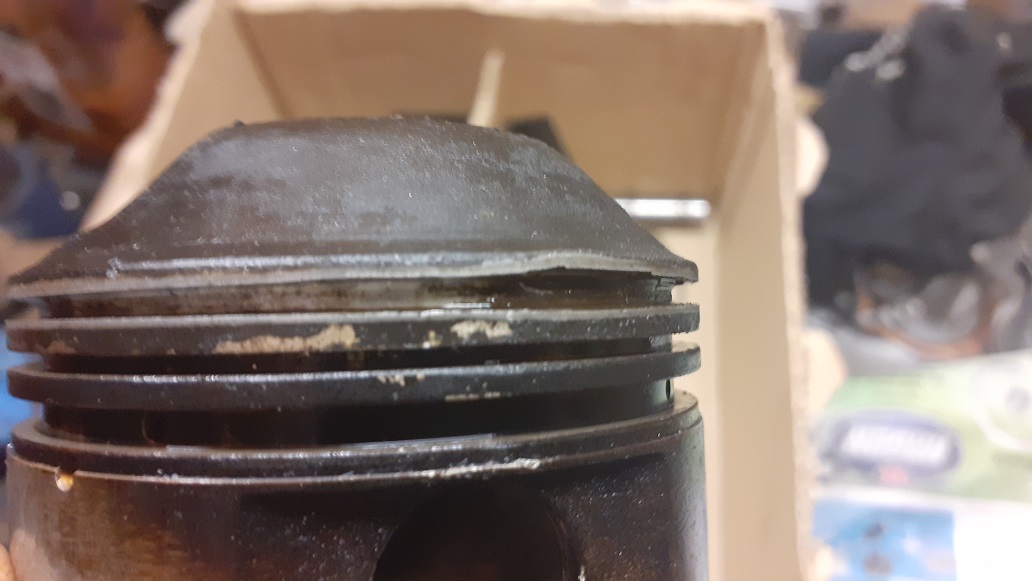
I stood and stared at the top end of the engine for some time. As well as evidence of oil leakage, there was quite a bit of black stuff on the head, possible evidence of a blowing gasket. One of the pushrod tube seals was hanging off as well. Oil leaks from the pushrod tubes is a common problem on these things. Mine had Triumphs best effort to prevent this and with care and silicon gasket sealant you can get them oil tight. I also wanted to verify the condition of the big end bearings. When it had fired up the oil pressure light had gone out instantly and stayed off for a few seconds after shut down so on the face of it all was well. But it would be nice to do some waggling of conrods to double check. So I set too and I'm very glad I did as I finally found some horrors.

You can see the dark staining - combustion gasses passing over the head joint between cylinders...
Then it was time to lift the barrels and see what was what. Second horror:- both top piston rings were in bits. No scoring on the bore though but the top ring land (groove that is) on number one piston had obviously seen some action. Looked like the broken ring had wedged under itself and splayed the land apart. I suspect this could well have happened early in the bikes life as it was all worn smooth with no evidence of bore damage.

Now what. The bores measured up as being worn but with plenty of life left and no barreling or ovalling. I had a look at some pistons on ebay but I was less than convinced that the claims of 'new old stock' were true. Eventually I decided to give the bores a hone and fit new pistons. I'll not go into the ins and outs of replacement pots for these but a pair of Harris pistons arrived and despite there far east origins looked identical to the originals and crucially weighed the same to a gram. At £90 they were a bargain. My last Trophy had a pair of Italian made GPM pistons for most of its time with me (which I think cost £90 in 1998!) After about 20 odd K it started smoking and lifting the head revealed them to have cracked right across both crowns, one side almost being in two bits. I got a pair of new, old stock hepolites as replacements and these cost me £150, in 2003!
Below the barrel all was well. The conrods looked brand new and polished to a mirror shine. Every other brit bike I've owned has had rods that looked like they had been thrown around a shed for 40 years so this was a revelation. The big ends felt smooth and firm, the crank spun freely and there was no sign of any debris in either the bottom of the cases or the sump filter.
So rebuild time. I honed the barrels, gave them a thorough clean up and re-paint, bought a top end gasket set and set to. Barrels on no probs (with the aid of some home made piston ring clamps) but then a snag. Keith called to say the head was bent, again a not uncommon problem if its been run with a blown gasket. Fortunately he could get it skimmed so I left the engine and did the brakes, forks and head bearings.Finally the head was done and after some rumination I got a thicker head gasket to avoid any potential piston / valve interface. Putting the heads on these things is a marathon as once you start, you can't stop. Pushrod tubes, head (with gasket), nip down, insert pushrods, fit rocker boxes, ensure pushrods engaged in the tappets, nip down again, make sure everything is as it should be, torque up bolts. Phew! In my hey day, I could do it in half an hour. Today I took my time, not wanting to foul anything up or forget anything (I once forgot to put the pushrods in, only discovered when I tried to set the valve clearances and couldn't understand why they weren't moving....). It took an hour or so but went smoothly and a thorough check before the torque wrench was deployed indicated all was well (we'll come back to this). 9 clicks later and it was done. Checking the valve clearances they were well wide so looks like the thick head gasket will have lowered the compression somewhat. Probably no bad thing but if the top end ever has to come off again, I'll use the standard gasket.
Further faffing was needed for the exhausts (which had put up a fight coming off) as they needed a thorough clean up and polish, a new balance pipe and clamps and a new baffle in one side. Oddly, you can buy perforated stainless tube on ebay no probs, but not perforated mild steel. Oh well, I got a length, hammered it in and secured it with a bolt in a drilled and tapped hole.
Next up the timing cover. Behind here is the oil pump which I wanted to check out, as well as the oil seal which goes on the end of the crank. This is important as lube for the bottom end and bores goes into the crankshaft to the big ends and then sprays from the conrods up the bores. If the seal leaks then destruction will not be far behind. Whaddya know, the oil pump was mint and the timing gears likewise. In with a new seal and back together. The advance / retard unit looked new, the points showing minimal signs of wear or adjustment. I'd used a boyer electronic ignition on my old Trophy but these are pretty crap really and tend to go wrong in odd ways, and at unexpected times. Points are simple and idiot proof and once set need little adjustment. Best of all is a plug in the back of the cases into which fits a wee plunger which engages in notches in the crank at top dead centre and 38 degrees before, the timing point. A search of my shed found said timing tool as well as the clutch and camshaft pullers so I mustn't have passed them on when I sold my old one, some 17 years ago. I spent a deal of time on the err... timing and that was one more job done. Next!
The wiring caused a further head scratcher. Everything worked but it all looked a bit ragged and the insulation somewhat brittle feeling. For the sake of not much money and a few hours I re-did it. This involved a bit of soldering iron faffing as mine croaked and the replacement was crap. My mate Dawn came to the rescue with good solder and flux and the lend of her prof standard iron. Not a bad job all in all and on testing it worked first time with no blown fuses!
The tyres were another minor dilemma. The Dunlop K70's (which were the original fitment - I'd guess these were the third pair) looked hardly worn but being nigh on 30 years old were somewhat hard and had many small cracks in the sidewalls. It was a no-brainer really. Dodgy tyres would just end up with it and me on the deck so off they came and on went a new pair of K70's, still available and actually well suited to these machines, given that you tend to run out of ground clearance before you run out of tyre. That said on my last one I ran Metz ME 33/66's, also still available. But you have to run them over size which precludes use of a chainguard and isn't really in keeping with the bikes age. So this time I stuck with the originals, now allegedly updated to modern compounds. The original Dunlop chrome rims were in reasonable nick so they got cleaned up and I painted the insides to keep the rust at bay.
Err. Now what. Fuel it and kick it I guess. More faff ensued when it turned out my cleaned out petrol tank still had some sediment left in which neatly blocked both taps. I cleared this only to discover both taps were now leaking and no amount of lapping of the cone shaped tap made any difference. Cue much teeth grinding. Fortunately I had a spare pair kicking around so finally it was fuel on, flood the carb, ignition on, prod the kick starter until you feel compression, then welly it. Second kick it fired but it wouldn't stay running. It went eventually but seemed very reluctant to rev up and sounded horribly retarded. However it sounded fit mechanically and there was no smoke out of the pipes so hopefully my new pistons and rings were playing nicely with the honed bore.
There then followed a protracted period of fiddling (and swearing). This was another memory jolt. There is always, always a point when you want to throw a match in the tank and give the whole thing up as a bad job. It sounded like carburation - the dreaded amal concentric pilot jet woes - but I knew the old adage - 99% of carb problems are electrical. I went through everything, fitted new condensors (these are two small capacitors which suppress the spark across the points gap), hot wired the coils to the battery all to no joy. I re-checked the timing only to discover I'd screwed it up and set it to top dead center, not 38 degrees before - so much for being careful. Ah ha! Only it still wouldn't stay running until the lump got hot and still wouldn't rev up. Must be a 1%er then! Sure enough I fitted the carb off one of the Ariels (which is technically too small) and after a bit of reluctance it went and revved up fine.....
During all of this I'd been awaiting the reg number. I'd got the dating certificate from the TOMCC before Christmas and the club registrar had advised it had originally been supplied to Elite Motors in London. I'd actually seen the 'Elite Motors' badge on the tail light housing but not made the link with this famous London bike dealer. This meant it may have an original number. In the event, the registrar couldn't trace anything so I went ahead and applied for an age related number. But interesting all the same. Its definitely a US spec bike so I suspect that someone, maybe a US ex-pat, bought it over here then took it home with them. So no need for all the NOVA import stuff (which the guy I bought it from had sorted) after all. If he had managed to get it into the country under the nose of customs he would have saved himself the duty and import fees. Then, after a mere 4 weeks, the brown envelope hit the doormat. Hello LWT 319H.
Further teeth grinding ensued when I noticed oil on the outside of the inlet pushrod tube. Given how much care I'd taken fitting the seals I was miffed to say the least. I was on the point of pulling the top end again when I noticed it was coming from the top seal, not the bottom (where the oil was collecting). Deploying my recently acquired micro USB camera revealed a small crack in the pushrod tube just on the top flange. Right, get in with the silicon. Loctite 5980 is extremely sticky and persistent (to the point where removing it is extremely difficult) and is generally the solution to all of the historic oil leak issues suffered by these bikes. So I cleaned it all up and smeared a generous dollop onto the area around the crack (OK I was a bit more scientific) and hoped for the best.
In the meantime I'd cleaned out the carb again for the nth time. This time I drilled out the blanking plug at the back to get access to the pilot jet. This had a (tiny) drill pushed through it and much blowing out and skooshing with WD40 followed. This was the last roll of the dice. If it didn't go then a new carb was in order, more expense!
I was actually slightly nervous about giving it another go. I was also aware that my neighbours over the back fence were probably getting a bit sick of hearing the thunderous racket (of me swearing) as well as the sound of a throaty 650 twin on open pipes being revved. So after much deliberation and a day in the office, once again it was on with the fuel, tickle the carb (i.e. flood it, more amal foibles) kick once, vroom, dies. Kick again: Vroom, vroom, vroom. I felt more relief than jubilation, but it settled down to a very steady tickover, oil was returning into the tank (but not out of the pushrod tube thank fuck) it was happy to rev up and it sounded as fit as a fiddle. Of course in theory I'm not allowed to ride it but there is enough wiggle room in the regs - I'm talking covid lockdown nonsense here - to get out on it (I'm going shopping / doing exercise / driving to my extended household, Officer) so the finale of this post will be a report of the first run.

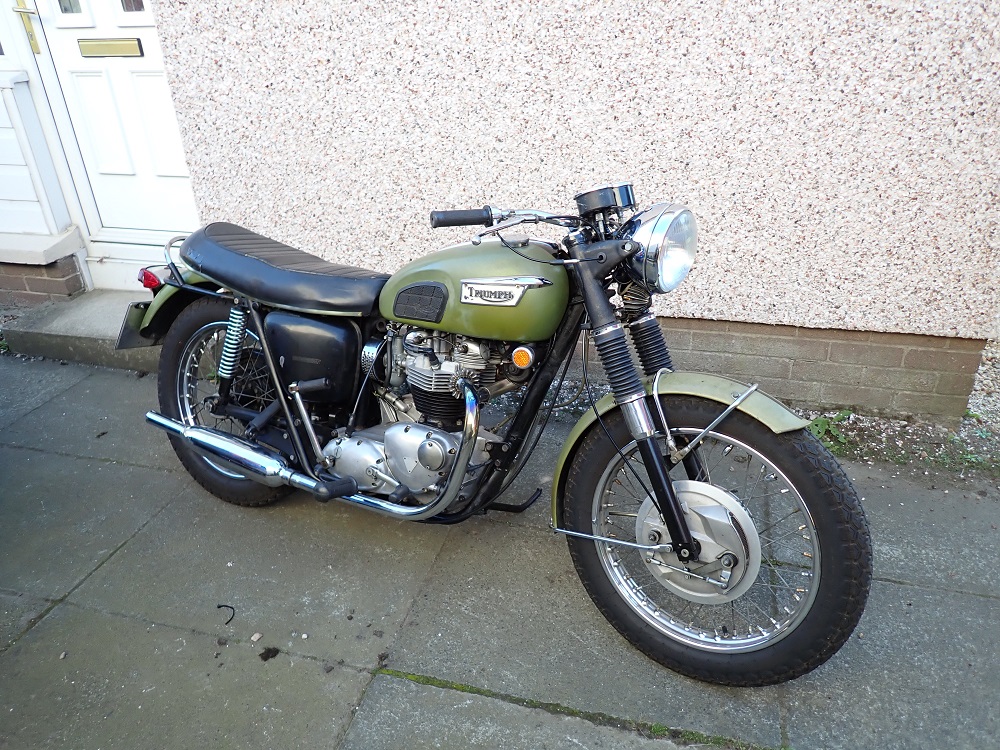
The finished article. Not that much different from the pic above but its only skin deep!
The sun was shining, I got my gear on, wheeled the machine onto the drive. Flood carb, ignition on, find compression, welly it. It fired first kick and settled down to a steady tick over. Lift clutch and snick it into gear. No lurch indicating a dragging clutch and a smooth take up as I let the clutch out and pulled out of the drive. I didn't go far - about 8 miles - but it pulled strongly, handled sweetly and sounded fab. There was still a bit of hesitation at low throttle openings (just off the stop). Just a bit of 8 stroking and hunting suggesting a bit of needle tweaking required. Best of all, when I got back the engine was devoid of oil (on the outside that is!) so my sealant bodge has worked for now. I'll fiddle with the carb some more, ride to work a few times and generally treat it like a new bike for a few hundred miles. The bores won't need much running in, I just want to make sure all is well before I change the oil, give it a good going over and then start to ride it in anger.
Vroom!
Further update:- After much fiddling the original carb was declared to be scrap. Long story short, Amal concentrics can cause all sorts of problems off tickover due to the pilot jet circuit getting clogged. Much cleaning seemed to make no difference whatsover. Eventually I gave up and went carb hunting. Annoyingly new ones were all out of stock but lo and behold, my mate Keith turned up a nice Monobloc that had come off a Bonneville TT. As it happens its the same spec as for a pre '68 TR6R so after some fettling, much faffing with cables and fuel pipe it went on. These are a better carb all in all and much easier to clean and fettle. First kick and vroom vroom vroom. Totally sorted!
2022 Update...
So after the above I used the bike a fair bit last summer, including a run up to my friends in Speyside over the A939 in somewhat damp weather and down to see Mum and Dad at a holiday cottage they had rented in Rockcliffe. Both runs saw me use much of the bikes performance with some sustained speed work (As they used to say in the 'Motorcycle' on road tests!) indicating all was well(!)
I took it off the road when the road salt appeared with a vague plan to pull the whole lump down. My one concern had been the sludge trap in the crank. This is part of the bottom end oil supply and theoretically takes sediment and debris out of the oil like a centrifuge. After a while they can block oil ways and a big bang will shortly follow. Plus I was a bit worried about it having sat with old oil for 30 years. This can corrode journals and bearings leading to further chances of something horrible happening. So I really needed to have a look see and winter is the best time to do this.
Of course I never got round to it and buoyed by how well it had gone last year, when Spring arrived I dragged it out and got on with it. I'd actually reverted to a Concentric carb over the winter as I'd sourced a new body. The other bits I'd bought for the old one meant it was practically new. It turned out the duff pick up from tickover was due to a faulty needle jet (a new one, the worn old one was actually better) so this got renewed and the bike started much better and ran nicer as well.
On the first of many hot days we've had this year I went out for a local run after a few trips in and out of work. The throttle was used and the performance and handling exploited. Going back to my text at the start of this article, these really are fine bikes, away from motorways. Small, light, low and poky, just what a motorbike should be, rather than some vast edifice cluttered up with tech. Except when I got home I became aware that the oil light was flickering on at tickover.
Uh Oh. This is typically the first sign of a failing big end as these are plain shells which retain oil pressure until they wear. Odd as they had seemed nigh on perfect when I had the top end off in 2020. A check of the sump plug and gauze filter revealed nothing in the way of white metal from the shells which was doubly odd. The only other cause could be muck getting under the oil pump's non return valves which reduces oil pressure. So off with the pump and check out the oil tank.
So began a voyage of discovery. There was a layer of wax like gunge in the bottom of the tank which I couldn't recall from my work in 2020. I thought I'd cleaned it out but obviously not. So off it came, clean out, fit new oil pipes, strip, clean and rebuild pump (which seemed to be in less good nick than I recalled) and have another go. Result - the same. Still no debris in the sump but this was starting to look like further investigation was needed. My mate Keith was of one mind - strip it. It's not hard, won't take too long and means you'll have peace of mind.
So. Off we go. Keith was right in that taking it apart was straightforward at least. First job was to remove the peripherals - exhaust, carb, coils, head steady and various cables and pipes. Then off with the top end (bores and pistons still good), primary drive off then undo engine bolts and lift the lump onto the bench. I was taking stuff apart that had last seen the light of day at Triumph Meriden but as with my previous work on the bike, nothing was siezed and everything seemed to be in good order.
First check was the cam wheels. What I thought were the correct pullers weren't so the first of many orders went in for puller, full gasket set, oil seals and a few sundry bits and bobs. I had already ordered and received a new oil pump thinking this was the solution to the low pressure but this is a fools errand which I'd realised before trying it out so it was still in it's wrappings. There are two options for this - a Morgo two valve (basically a bigger version of the standard pump) or a later T140 4 valve pump which requires grinding of the timing cover to fit. These weren't available so the Morgo would do and does represent an improvement on the standard pump. The crank cases were then unbolted and split and the drive side lifted off.
I was awaiting another special tool to pull the timing pinion off the crankshaft before it could be removed. You see many cranks on these bikes totally mullered where someone has tried to hammer it out of the case and pinion. Not sure how I'd done this previously (I didn't use a hammer, to be clear!) but when it arrived the puller took the pinion off effortlessly and the press was employed to push the crank out of the timing side bearing.
So what have we got. Both conrods were unbolted with a certain amount of trepidation. First impressions were good - big end journals seemed fine with some small staining patches from the old oil but no scoring or damage. The shells were well scored however, particularly the timing side. You'd think that if an oil supply issue occurred it would be the drive side (i.e. furthest away) big end would suffer first but for whatever reason, it's always the timing side that gets it first - I've considerable experience of this! So that looks like the problem but I was miffed that this had occurred given the general good overall condition of the engine and it's low mileage. At least it hadn't gone bang, something that would likely have occurred if I'd kept on riding it.
Finally I wielded my newly acquired micrometer at the journals, workshop manual in hand. Both measured as being exactly on the largest allowable size - in other words how they had left the factory. Phew, no faffing getting them ground, just new shells required and a bit of a polish.
An ex big end shell.The next marathon was the removal of the sludge trap. The slotted plug resisted all attempts to be removed so a further delay ensued as I awaited a better socket to get it out. It relented eventually and I could peer inside. Whilst there was a thin layer of compressed sludge this wouldn't be an issue, oil supply wise. Of greater concern was a dollop of gooey, oily, swarf laden gunge which slowly flowed out of the plug hole on up ending the crank. That'll be the culprit then! I'd noted tide marks all over the inside of the crank case and caught in casting ribs of a similar black gunge. So looks like this has been circulating round the engine. Fuck, what a mess and a clear indicator that I should have had this all apart from the word go. Oh well, I'd more or less gotten away with it in terms of no terminal damage although its source was a mystery. My guess is that it was old oil that had sat in the trap for 30 years and partially dissolved the waxy deposits in the trap. When I'd run the bike in I'd used some cheap 20/50 which had detergents in it and I suspect these may have also contributed to the formation of this gunge. Removal of the trap tube itself was another fight requiring me to drill it and chisel out (carefully!) The manual suggests hooking a spoke in its locator hole and pulling out. Ha! Much cleaning out and blowing out followed. My top tip is use of a paraffin sprayer connected to a compressor, and loaded with white spirit for this. I blasted through all the oilways followed by final clearing with compressed air. And then I did it again, and again - no chances this time! Inspecting the bearings indicated some roughness and evidence of roller scuffing (drive side.) It was a no-brainer, get new ones - spendy (nigh on £200 for the mains and gearbox bearing which I decided to do as well) but worth it for piece of mind.
Finally all was done, and ready for the rebuild...
Now in the old days I had a bad habit of doing these rebuilds in somewhat un-sanitary conditions. Garage floors, filthy and cluttered work benches, even in the street! Cleaning of parts had also been a bit variable with a tendency to give things a wipe down with an oily rag before cracking on, usually after they had been left lying around in a tin or box. This time I'd made an effort with a mass shed tidy and clean up pre engine dismantlement and much use of bags and boxes to keep all the bits in order. Considerable care was taken with everything and a lot of time was spent cleaning things up. Thanks to a salt free life, the cases came up like near knew. Removing old jointing compound took a while but by the time that the new bits arrived everything was clean as a whistle and I had the workbench tidy and covered in Old Bike Marts.
So off we go again. The first check was the drive side main bearing. The old one had come off rather easily so I groaned when the new one was loose on the shaft. Not rattling loose but it could be turned easily. Mic-ing it indicated the journal was 0.02mm under the minimum size. The drive side crank nut has obviously loosened at some point, hence the damage to the rotor keyway and I suspect this is when the bearing would have spun on the shaft, hence the wear. Solutions to this are varied - spray on metal (kind of like welding) and machine down is the proper way or point the blow lamp at it and smear solder over it being the bodge. This would either involve a third party (and money and delay) or a somewhat dubious solution. The loctite website provided the answer. 648 retaining compound is designed for wide clearances (up to 0.25mm allegedly) and high temps. That would do (I'm told auto manus use it to avoid having to press bearings onto cranks / shafts etc in the interest of cheapness...) as the bearing is clamped up by the rotor and I would make sure this would never come loose (i.e more loctite!)
So I twiddled my thumbs for a few days awaiting the postie before proceeding, using the delay to heat cases and fit the timing side bearing and gearbox bearing. After some thought I also decided to have a go at drilling and tapping the boss in the gearbox casing to take a detent plunger (i.e. undo the mess noted above.) I mucked around with various homemade jigs and drilled a pilot hole on target. Annoyingly the last drill to near the tapping size went squint. I could feel a cold sweat forming as I didn't want to wreck some very nice cases. Further jig refinement (and more waiting on the postie) left me with a 5/8" unf nut welded to a bar clamped to the cases which would hopefully pilot the tap down the hole to square it off. This took a long time as the tap was having to carve a path somewhat different to the pilot hole which was also undersize. I got there eventually and all seemed well. But I'd lost confidence in the exercise and I needed to machine a diameter into the hole as the plug isn't threaded all the way. So it got filled with a socket stud held in with (more) loctite and silicon. Trying to ignore this bodge I proceeded with the rebuild.
Speaking of loctite I've discovered 574 flange sealer. This is really good and makes a fine substitute for what triumph used on joints that don't have a gasket. I've used silicon in the past but this can stick covers on immovably and also tends to get everywhere. Fine for when the joining surface is knackered but OTT elsewhere. Other products are available but I've always found them a bit rubbish. This went on the crank cases and I bolted them together carefully. Oh dear, the crank locked up as I tightened them. It took a while to figure this - I eventually realised the crank hadn't been drawn into the timing side bearing so instead was pressing against the drive side bearing. The solution was my 20T press, carefully deployed to push the crank fully home. Sorted.
Next stress creator was the cam pinions. My newly acquired puller had the means to press them back on but one got stuck on the woodruff key and jammed it into the phosphor bronze bush. I bit of careful tapping and faffing got me nowhere. More cold sweat as if I knackered the bush the cases would have to be split, a new bush bought, pressed in and line reamed. Careful work with a small file erased the minor damage and I tried again. More careful tapping (and a thump) got the wheel started on the key and then the puller did the rest. Phew again. Torque wrench deployed after a web search for the figures, absent from the manual. I was going to use this across the board rather than my usual method of doing nuts up as tight as I could, all in the interest of doing a proper job!
I could build the complete lump on the bench but it weighs 140lbs apparently and my back would likely object to lifting this into the frame. Instead I dropped what I'd done so far into the frame with minimal stress. Next was to get the pistons and barrels on so the conrods weren't flailing around - I was keen to preserve their mint condition!
Now for some transmission. Bash in the sleeve gear, fit the gearbox sprocket and re-attach the chain so I could stand on the back brake whilst tightening up various transmission nuts. Fitting the gear box internals lead to further muppetry. I'd figured this out the first time so not sure why I got it wrong this time. Worse, as it was selecting some gears I thought it was OK so tightened up all the bolts and fitted the outer cover - we'll come back to this...
The primary drive went on without a hitch and I also connected up the oil supply and filled the tank so I could start circulating it ahead of the grand fire up. Old age is a terrible thing. After much scrutiny of web images to figure out which pipe is in and out, I got it wrong. Much spinning of back wheel to turn the engine over lead to some sucking noises out of the oil pump but no oil emerging from the crank feed. It's actually easy - the inner pipe is the inlet and the outer pipe the outlet. I creatively miss-interpreted the drawing on the web hence the mistake. Thank god I tested it rather than just lash it all together and try to fire it up! Anyway pipes were switched and oil duly appeared. I'd already used the pressure can to squirt oil into the crank until you could see it oozing around the conrods so with a final skoosh of oil into the crank cases, I was ready to button her up.
Except it was clearly not selecting all gears, despite my earlier assertion. I stared at it for a bit whilst uttering swear words and then without a further thought set too. My mistake was evident - I'd located the detent spring into the top gear notch fine but put the quadrant that links the gear lever to the cam plate (i.e the thing that selects the gears) as per the manual, not where it needed to be for top gear. This time I'd used jointing compound (i.e. loctite) instead of a gasket as this is what the manual says. I had worried that the gasket would allow lay shaft end float so figured doing it by the book was better. So this had to be cleaned off before re-assembly. Eventually it was done and I had a four speed motorbike rather than a three speed one.
Only the top end remained and a further marathon. Much inspection and cleaning of bits was done ahead of this. The crack in the inlet pushrod tube was actually a gap in the soldered joint between the sealing flange and the tube - a mistake from the factory which must have meant this thing sprayed oil from this joint from new. Maybe that's why the cases and frame were so clean! In a way I'm glad it was never sorted as this would have meant someone else ripping the top end off to sort, doubtless with many a bodge when re-fitting. Stuff like this makes meeting the original owner something that would be of great interest...
So after much thinking and prepping, I set too. It went smoothly over about an hour with 9 clicks of the torque wrench the finale. Carb, head steady, coils and exhausts were wrestled on, I confirmed I'd wired the points up the right way, mucked around with a few other bits and bobs and.... procrastinated over starting it. My excuse was sunny weather induced bike rides but eventually I ran out of reasons not to. In with fuel, tickle carb and kick. It went second prod and settled to a steady tickover. I'd already made the oil light go out just by turning over the engine by spinning the back wheel so was gratified that it went out and stayed out on firing and took a few seconds to come back on after shut down. A peek in the oil tank verified oil return so we were good to go. Off down the street then back again as a horrible noise was coming from the rear of the bike. Nothing more than one of the rear engine bolts in the wrong way round so rubbing on the chain, sorted easily thankfully. Of more importance was a lack of oil leaks or other horrible noises.
A couple of days later I went out for a longer run. I shouldn't need to run it in much just take it a bit easy for a few hundred miles so once I got it up to temperature I started giving it a bit. No 'speed work' but plenty of riding up and down the rev range of 2-4000 rpm. I did 50 miles via the local petrol station and got home. Only to notice a faint flicker of the oil light...
My heart sunk. A bit of foutering showed that the light was definitely on at 500-750 RPM, flickering to 900 RPM and off at 1000 RPM, it's notional tickover. It had been a hot day so a couple of days later I was out again in cooler temps. Definitely no issue at 1000RPM but dropping the tickover and the light flickered and went off instantly on shut down when it should really stay off for a second or two. Hmmm. This is so typical of these things - a problem arises, you strip the motor, find a problem, fix it, rebuild and the original problem is still there. All I can think of is that the new shells are loose. The rods felt OK so it would be very minor but I should have measured them as a mate had got a set of Harris shells and they had been slightly undersize.
After a certain amount of rumination, and a lot of web searching I sourced an oil pressure gauge and fitted it. Another run of 30 miles revealed the bad news - fast tickover pressure of just shy of 20psi (manual states 20-25) and a high speed pressure of just past 60. Actually not far off but given it was on new big end shells, crank journals at max spec and a new oil pump this wasn't good enough. Annoying as my last one just got lashed together and was absolutely fine.
Inevitably my thought draws to crap pattern parts - specifically the big end shells. Fair to say this isn't something I'm particularly pleased at, but what do you do? Kick yourself for not doing a full strip when I got it, and before I fired it up, obviously but for now I'll just have to suck it up and have another go. At least it will take a lot less time!
So. Apart the engine came again. Much scrutinising took place and the headline was a complete lack of problems. Big ends OK, shells, faintly scuffed but fine, journals good. So what then? I got my hands on some 'plastigauge' - basically thin strips of plasticene which you put under a plain shell bearing, torque up and then measure the squashed width to determine the clearance. This came out as bang in the middle of the spec - good news in a way but I was looking for an obvious fault! I'd sourced new shells which were alleged to be American and therefore much better than the Taiwanese made Harris efforts but my measurements indicated there was fuck all wrong with these.
The only concern was more swarf laden oil coming out of the sludge trap. Where the hell had this come from? Not the big ends, obviously so had it been lurking there after all my cleaning? So what to do. Throw it back together again, obviously. I had to buy another sludge trap as I'd mangled the last one taking it out to check. The crankshaft oil quill was scrutinised but found to be (just) within spec, and the oil pump was new so what the hell else could be wrong?
Don't know so I nailed the thing back together with a modicum of swearing (the gearbox put up a fight) and much care and attention. I was slightly stressed about doing two rebuilds within a few months after the thing had been together for 50 years but figured that most this age would have been apart a dozen times or more at least, and with a lot less care and attention than I'd paid, so I was sure it would be fine.
No. Same problem, no change. Fine until the oil got hot then the pressure would drop to about 5psi lower that it should be. Time was, I'd have reached for the box of matches, but a mantra came back to me - the better you get at sorting these things, the better they get at fooling you. So I set too, eliminating the possibles. Oil pressure relief valve spring - in with the old as the new was clearly duff, measure up as being a lower rate than standard. No change. Put original oil pump in, maybe the new morgo was duff. No. Right, this all started when I changed the oil so maybe I bough a batch of duff oil. Drain the lot, including out of the filter. Hmm, I'll put the morgo pump back on and make sure all is well with that, the gasket, the oilways and everything else associated with the feed. Oh, better check the oil seal in the timing case which seals against the crankshaft. I'd renewed this during the original rebuild and replaced it again when I did the bottom end.
Popped seal. Looked at it. Looks fine. Push onto end of crank. Its a loose fit. Eh? Measure crank journal (for the nth time). Just in spec as previously determined.... What the fuck? I compared the seal to the one that I'd taken out and it is quite clearly bigger (internal dia that is) Much measuring and it's way too big. What the hell?? I pause for thought - this is quite clearly the problem and the timings work out. Original oil pressure problem due to worn big end shells thanks to gunge in sludge trap restricting oil supply. Fix this but introduce new problem - wrong oil seal which is good enough when the oil is cold and thick but not when it's hot. Not enough to lose all pressure, just for it to be a bit lower when it's hot.
I uttered a damning curse to all suppliers of defective pattern parts (not actually sure who this was but...) and ordered a new seal after much scrutiny of parts, pictures and the web to ensure I go the right one. Of course the hardened cynic in me wonders if this still isn't the problem, but it feels right. I've sorted this.
Well yes. I think. First test with the oil pressure gauge suggested it was still a bit low. I then fitted the old pressure switch and on came the light (again!!) at very low revs. On with the new switch and the light is off. I switched off the fuel and ran it dry. As the tickover dropped to a stall the light flickered and came on. I'll live with that.
So slightly inconclusive to be honest - I seem to have identified the original problem - i.e the pressure switch was sticking so the light was not going off when it probably should have. I replaced the worn big end shells (twice!) and cleaned a lot of gunge out of the motor. I fitted a crap oil seal on the end of the crank and then replaced it with a proper one. I fitted a new oil pump which will help whatever, and I faffed with the pressure relief valve until I was happy it was doing it's job.
I also bought a new bike, actually another Triumph Tiger but with an extra 150cc and only 11 years old instead of 52... This has replaced the ageing GS so will be used secondary to the (real) tiger which I'm going to crack on with. If the motor goes pop then at least I'll know what went wrong....
The Old (looking particularly fine in the summer sun!)
And the new(er)More later....
2023 Update...
So at the start of Spring '23, the Trumph got dragged out, fired up and ridden. Expect within 50 miles the oil pressure light was on at all but medium revs. Fuck. So back to square one but I just couldn't be bothered so it was shoved in the back of the garage and forgotten about. The newer Tiger was used but I ended up with this in bits, fixing starter motor doing the valves (shim under buckets - a total faff) and sorting various other previous owner induced fowl ups.
Until August. I was still keen to persevere with the 650, especially as my love affair with the 800 had waned somewhat. I knew the problem was something obvious I was missing but the only option was to strip it again but this time check everything - twice! So apart it came again and I embarked on a full test programme. Of interest was that all sets of big end shells, including the scored original ones, checked out on clearance. This wasn't the problem. But... long story short, everything checked out as mint:
Valve guide to cam follower clearance - check
Oil pressure relief valve piston to bore clearance - check
Big end clearance - check
Oil pump - check
So time to start testing other stuff. I codged up a test rig for the oil system that I could check with a bicycle shock pump. This tested the crank oil seal (blew out at 100psi - check), oil pump bores (took 150psi with no leakage), Relief valve (no leaks, works as prescribed)
Then I went for the oil pressure switch. First I calibrated the gauge - OK at high pressure but not at low. Hmmm. Then the original switch - sticking at high and low pressure. Hmmmm. Then the new switch - oh for gawds sake, it's leaking through the body, hence no oil pressure - another duff pattern part. Much teeth grinding followed (and swearing). So this has been the problem all along - sticking original switch, a few more wild cards (i.e. the duff crank seal) then a new switch failing.
So back together she goes with a lot more confidence. Best of all I sourced a new oil pressure switch which comes on at 3.5psi not 7. I know this is dodgy but I just want something to tell me there is some kind of oil pressure, I don't care what it is! Rebuild all good - I took my time over the winter as and when I felt like it. This is a far cry from my youth when it all seemed to have to be done at the last minute with many a midnight shed sesh the result.... Anyway it fired first kick, but lo, the clutch wasn't, thanks to totally overfilling with oil. This fixed, it went like a dream on a rare mild and sunny day that have been few and far between this March (2024.) A bit of local bend swinging once again showed how fine these things are and no oil light!
Anyway the other Tiger is going (still too heavy although nice enough) something else new is on the way but the 650 is going to get ridden. More later...